Creating a widget not only allows your readers to be enticed by a visual image of what you are referring to, but also allows them to shop directly from your posts. So when setting up your blog post for the day, keep in mind that you can strategically make more money if you include both links and widgets in your post. The more places you have for your readers to click on, the more money you will make! If you’re a WordPress beginner, here are step-by-step instructions on how to create a ShopStyle Collective widget on your WordPress blog post.
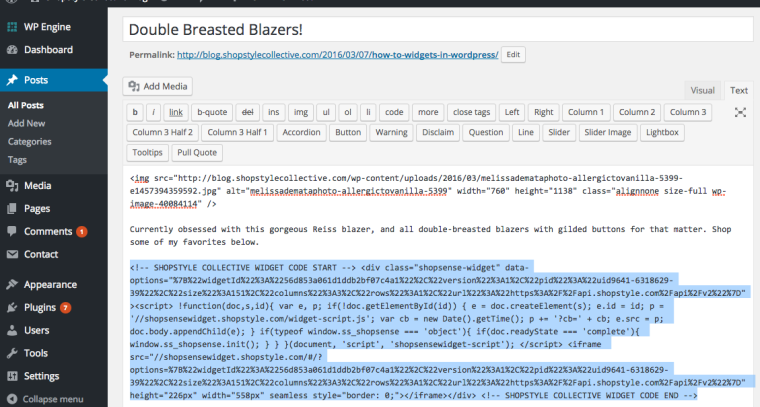
1. In your WordPress blog post draft, click Text mode (at the top right corner); this is where you will begin and end the draft process to insert a widget.

2. Create your widget to accompany your blog post. Follow these detailed instructions if you’re not sure how to create a widget. Remember to the width of the widget so it matches up with your blog post.
3. Once your blog post is drafted, copy your widget embed code and paste the code into your draft blog post while in the Text mode.

4. Click Save Draft.
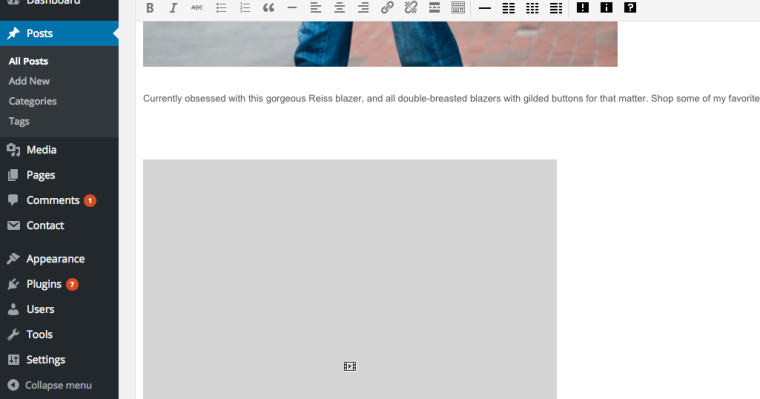
Note: if you go into the Visual mode in your blog post draft, you will see a large gray box with a mini video icon where your widget should appear. This is normal. Once you click Preview, you will see your actual widget as it would appear on your blog post, not just the gray placeholder.

5. Click Preview to see how the widget would appear on a live blog post.
6. Publish the post when you’re finished drafting the post.
Troubleshooting your widget
If you see a duplicate widget in your blog post, try pasting the widget code once the rest of the post is done and do not click back to the Visual tab. Depending on your WordPress implementation, sometimes switching between Visual and Text modes could cause duplicate widgets.
If your widget is not displaying completely on your blog post, make sure the size of the widget matches the width of your blog post.
I hope these tips help clarify on how easy it is to use widgets on your blog!
Pro-tip: always use both text links and widgets to maximize your clicks!
xo,
Carlina
Hi Carlina,
I’m getting through step 4 of your instructions perfectly. I’ve created my widget, inserted it into the blog and see the grey box with a mini video icon. However, when I go to preview and even after I published, only the code appears in the blog post. I can click the code which takes me to a new page that has my widget on it. But obviously I want the widget, not a long code on my blog. Do you have any troubleshooting suggestions?
Thank you!!
Help! I can get to step 4 above but the widget does not appear in preview mode or when i publish. Do these instructions hold true if my wordpress blog is hosted by wordpress versus being self-hosted? Thanks Carlina!
Carolina, Does this work in WordPress.com? Thanks!
Jill